Showing posts with label iPods. Show all posts

Thursday, April 30, 2015

Math Apps

My class has really enjoyed using the iPod Touches when they have free time.  We also use them every Friday in our math stations.  Since the students are assigned to a specific color iPod in order to save their progress on some apps, I have to plan out the groups quite carefully.  If I put two students in the same group who are assigned to the same iPod, someone is going to be VERY disappointed.  After several weeks of trying to figure out groups, I got a great idea. With the iPod assignments right in front of me, I created a doc that has THREE different groupings that allow everyone to have their own iPod when their group arrives at the iPod station.  I printed off six copies, stapled them together, and tacked it to the bulletin board above my desk.  Now when Friday rolls around, I just cut off one of the charts, and I'm all set.  I fill in the activity and location where each group will start.  This way the groups are different for three weeks before repeating.  And I made sure to separate the kiddos who need to be separated.  You know what I'm talking about!

Click HERE to see my google doc for groups.

So what are our favorite math apps?  Our latest addition has all the kids buzzing!  It can be played by two people on the iPods and up to four people on the iPad.  It's called Math Slide.


It starts as a free version, which allows you to see if you like it. You get to play each of the ten different games twice.  After deciding it would be fun for the kids and help them improve basic addition and subtraction facts, I upgraded to the $1.99 version, which allows unlimited games. You have to do that as an "in-app" purchase.  The lower numbered games are easier.  Here is an example of Game 6 being played by two players.
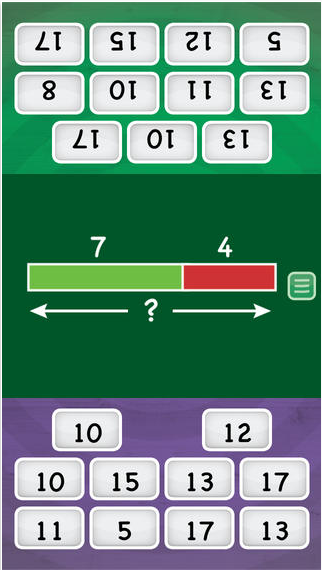

Students have to compute the problem and be the first player to slide the correct answer tile into the middle of the board.  Use all your tiles first and you're the winner!  Here is a picture of four of my students playing on my iPad after finishing their math work.


Another math app we love is Smart Cookie Math by Molly at Lucky to be in First.  You can read all about her fun app HERE (on her blog).  I have many students who have already filled their cookie jars, and we just started using it in February!  By the way, Molly is the blogger who gave me advice on how to use my iPods as a listening center.  Thanks again, Molly!


We have also been enjoying Bean Flip.  Do you know Teacher Tipster?  Love his youtube videos.  He's a riot.  Wish I had been in his class as a firstie. (No offense intended, Miss Murtha.)  We also adore Subitize Tree, but it isn't compatible on the iPods, just our iPad.


Here's a math app that I added for my students who really enjoy challenging themselves.  It's called Sushi Monster.  I didn't think it would be very popular, but as usual, when a few kids show success on a game, the other kids want to do it too.  So Sushi Monster is actually one of our most-played math apps.


Other interesting and techy projects I've been working on include using Vocaroo to record my voice reading books, and then printing out a QR code to put on the book cover so my students can use the app i-nigma on the iPods to link to the recording.  This has been a huge help during our Read Across Genres unit from TC.  It allows ALL levels of readers to access the information. I've also been experimenting with Animoto.  I'm going to make a video slide show of all our first grade pictures this year and then give each student an end-of-the-year card with a QR code that links to it.  I learned how to do that HERE.

In other news, our caterpillars are HUGE.  We've had them for two weeks, and a few are already hanging in their J shape. I'm expecting to find a chrysalis or two or five when I get to school tomorrow morning.  Oooh!  It's going to be an exiting day!


Saturday, March 21, 2015

Monthly Playlist of Books on ipods

Having just one playlist for the first graders to choose from has been wonderful.  No getting lost in the wrong playlist, fewer pictures of books to choose from... truly, problems and confusion have been ELIMINATED.

Once you have created your playlists, drag your books to the month you are most likely to want to share them with the class.  As I mentioned in my last post, keep track in a notebook or on note cards.  This will also be helpful when your desk is completely covered in tapes and you are trying to remember which ones you've already recorded. #learnedthehardway

More Than One ipod

I requested four ipod touches from Donors Choose, so I had to find a way to distinguish them when syncing with itunes.  I found it easiest to make a cheatsheet that reminds me which is which.


When you first connect your ipods to itunes through your laptop, give them each a name.  I made it easy by using my initials and the numbers one through four. 

Changing/Adding Playlists

As you can see the in the photo above, I have the red ipod connected to my laptop.  I opened itunes on my laptop and clicked on the icon of the ipod.  Then I clicked on Music (under summary on the left side).  Here is what I saw:


Notice that the boxes checked are "Sync Music," "Selected playlists," and "February."  Because I want it to be easy for the kids to get started with the book right away, I don't put the entire collection on the ipod at one time.  It's way too overwhelming.  I'm ready to switch to the March playlist, so I uncheck February and check March.  Then I click Sync in the bottom right corner of the screen.  Done.  Wasn't that easy? 

What My Students See and Do

When students are ready, they click the red itunes box.  


When itunes opens, they see the current playlist, which shows the cover of a book from that playlist and the number and name of the list (month).


When they touch the picture, the playlist for that month opens.  I only have four books ready for this month so far.  Don't worry, I have Moosekitos and Hippo's Tooth Surprise ready to record.


Students find the picture that matches the book in their hot little hands, and boom!  The story begins!


Here's a picture of a few kids in action.


Notice how there are only three kids?  The fourth kiddo decided to go off to a different spot in the room. Way to be independent!  Also notice how they're not all on the same page.  No waiting for everyone to get settled when you've got an ipod to yourself.  Thanks, Donors Choose!


Saturday, February 28, 2015

Books on Tape to iPods!

Howdy!  February went so fast!  Sorry it has taken so long to get back to you on how to change your listening center from cassette tapes to ipods.  Warning:  This post is for people who have never used an ipod or itunes.  Please don't feel offended that I'm explaining every little detail.  It was all new to me, and I figure I'm not the only one.  Here's how I did it...

Getting Ready to Convert Tapes to mp3s

First install the software that comes with your converter.  I have an  AGPtek USB converter.  I installed it on my Toshiba laptop.  You will also need to download the correct version of Audacity for your computer. Then connect the converter to your computer.  Be sure to put the tape in so that the side with the "turn the page" beeps will be recorded.  Also note the length of playing time.

When you open Audacity, you'll see this box:


Recording

Press play on the tape converter and hover your cursor over the red recording button.  Count to at least 5 before you click it.  If you begin recording immediately you will have a lot of silence at the beginning of each book.  Try to avoid that!  I did it this way so kids would not come up to me and say, "It's not working" just because there was a long silence at the beginning. ( It worked like a charm!)

Now, once I start recording, I set my little kitchen timer for about 30 seconds LESS than the length of the book, and then walk away.  It's a great time to fold a basket of laundry or make a bed, or whatever other chores you need to do.  When the timer goes off, zoom back to your computer, wait until the story ends, and then click the yellow stop square.  

Saving as an mp3

You'll need to click on File and scroll down to Export as mp3.  Type in the title of the book and click save.  Another box will open, allowing you to type the title, author, and album (I just do the title again for the album).  For genre I choose "other." Click OK. 


 It will take about a minute to export it.  Then you'll have the opportunity to go to File, New, and start recording another book, or click close. When you click close, it will ask you if you want to save the project.  This is optional.  You have already saved it as an mp3.  If you wish, you can also save it as an Audacity project.  

Adding Recordings to itunes

Now when you open itunes, go to File, and scroll down to Add File to Library.  Then find your story in your music file, and add it. It will look like this:


Saving Pictures for Later

I knew I wanted a picture of the book's cover to help the kids identify it on the ipod.  I went to google images and saved a picture of each book in a folder in my picture files.  I named each one with the title of the story so I could find them easily later.  


How to Add a Picture for the Book


When you open itunes, click on the "song" (it's a story but itunes doesn't know that.)  Then go to File and scroll down to Get Info.  On the pop-up box you'll want to click Artwork, and then Add Artwork.  This will allow you to upload a pic for that book.  Choose it from your folder of book covers.  Done.  

Organizing Playlists by Month

I created monthly playlists so that I only have to sync the ipods once at the beginning of each month and the students have an easier time finding the book they want.  Once you have monthly playlists (I numbered them so they'd be in order, otherwise itunes automatically does alpha order), drag the songs to the month you want them in.  I also used 3x5 cards to keep track of what went in each playlist, as well as the length of each book.  When I finally have all my books loaded, I'll type up the monthly lists and hang it inside the door of the cupboard with the books.

Helpful Hints

This has been a labor of love, as they say.  I worked long and hard on it the first weekend that my Donors Choose materials arrived.  I have a few tips to help you along your way...

1.  Save all your bookcovers from google images in a folder with titles as names.
2.  Record your books in monthly sets as you need them during the school year.
3.  Upload to itunes and add pictures monthly.  I do about 6 to 8 books per month.
4.  Save your directions so you don't have to "relearn" the process each month.
5.  If you do YOUR WHOLE LISTENING LIBRARY AT ONCE, do ALL the book covers, then ALL the recordings, then ALL the uploading and artwork.

Interested in seeing how I sync my ipods each month?  It's the perfect time for it... March starts tomorrow!  Watch for my next post later this week.  I promise not to wait another month!


Monday, January 26, 2015

Earbuds VS. Headphones

I'm back to tell you more about my ipods!  Let's talk about headphones and earbuds.  If your school has ever had lice, you know that when lice are present, the headphones have to be put away.  So I decided that earbuds would be perfect, especially after learning that they're a dollar a set at the Dollar Tree!  I sent a note home to my families, letting them know they had two options.  They could either purchase their own set and send it to school, or they could send me $1 to buy a set for their child.  I also let them know that I would accept an extra quarter if they wanted to cover the tax and help pay for the hair clips.  The hair clips are to keep the earbuds wound and untangled in the containers.  I just bought three packs of 8 plain brown and black hair clips, medium-sized.


 I also used 20 of the baby food containers with lids from my teammate's stash. Thanks, Dana!   Here is the result...


(For those of who are wondering, my student #11 didn't come to school this year.)

I taught my students how to use the earbuds and put them away.  I found it best to teach them to hold onto the plug while standing to let them unwind.  When it's time to wind them up, hold the plug again, flat against your palm with your thumb.  Then use your free hand to wind the cord around your four fingers.  Put the clip on.  Put it in the box.  Put the lid on, put it back in its place.  Done!  

One of the reasons I love using this tray with the baby food containers is that if we are using them in another area of the room, or even in the common area outside of our room, it's so easy to carry. There are no drawers to slide or dump out.  The baby food containers are easily replaceable, but we've dropped them without damage.  Also, the students never handle any one else's earbuds like if you used a box with compartments and one big lid.

But beware!  Earbuds are not perfect!  Many of my students can't fit the earbuds into their little ears.  And since I'm not available to insert them each time they wear them, we came up with this solution.  Get your book and ipod ready.  Then push play on the ipad, and pick up one earbud to hold in one ear.  Use your other hand to turn the pages of the book.  It's not ideal, but it works!


Thursday, January 22, 2015

Donors Choose & iPods for Newbies (Like Me)

No one in my family owns a Smartphone.  Or an iPod.  So when I asked for four iPod Touches on Donors Choose so kids could listen to books, I knew it could be done but had no idea how.  "I'll figure it out if/when it gets funded," I told myself.  Incredibly, it didn't take long at all!


I have to say, Donors Choose is AMAZING!  If you haven't tried it out, take a look.  Take the time to look at other projects on their website, especially those similar to yours.  Then think about your students and the amazing things you'll do if your project gets funded.  I had donations come from my extended family, my students' families, an anonymous person who used a gift card, and the bulk of my project was funded by Cellular One. Thanks again, everyone!

Perhaps you are in the same boat I was in for the past few years.  You have a giant wooden caddy for your cassette/CD boombox, headphone splitter, and six bulky sets of headphones.  Either the tape player or CD player breaks every year.  Girls are getting their long hair caught in the headphones.  Kids can't get the CD or tape to play.  No one ever bothers to rewind afterwards.  Kids accidentally blast a friend when they turn the wrong volume knob.  It's dusty.  There are goldfish cracker crumbs in the corners.  Sad.  So Sad.  Sometimes my students used their entire listening time just trying to get the story started.  Then they'd ask to stay in at recess to listen.  That's how much they love to hear stories.  I had to do something!


I Googled iPod listening centers to look for ideas.  I decided that my best bet would be to get four iPod Touches so the kids could listen independently from one another, AND we could use them for reading, writing, and math apps, too!  So my project included the four iPods, a tape-to-mp3 converter, a charge adapter for four devices, and a headphone splitter (just in case).


Well, I got everything I asked for but had NO IDEA how to use any of it.  I was able to load the apps, since I have an iPad for school.  But I didn't know anything about mp3s, iTunes, or iPods.  After lots of Googling, I emailed one of the teacher/bloggers I admire, Molly at Lucky to Be in First!  I'd seen her blog post about using and iPod for a listening center, but needed more details. ('Cause I was a newbie!)  She responded the same day!  Amazing.  She provided me with a couple of links to try out.  And it was just what I needed!  I am the kind of person who needs written step-by-step directions when trying something new.


I now have over 60 books on my iTunes account with pictures of book covers as the "album artwork."  I've organized the books into monthly playlists with six to eight books each.  When my students go to listen, they grab a bucket containing an iPod, stylus (they make it more fun), and the book for the week.  They add their own set of earbuds and head off to find a comfy spot to read and listen.  We are so excited to have this technology in our classroom!  It's easier for everyone!

Next week I'll share my tips and tricks with you for this entire endeavor, including converting tapes, adding the book cover, making your playlists, and teaching your students how to use/care for it all.